We will be using the Microsoft Graph API to both configure permissions and access the SharePoint site data.
- We will be using Postman to make http requests
- Create a SharePoint site
- Set up an Azure AD Application here: https://portal.azure.com/#view/Microsoft_AAD_RegisteredApps/ApplicationsListBlade
- Create a Client Secret for the Azure App
In this section we will obtain the SharePoint site ID.
Follow these steps to set it all up:
- Go to Microsoft Graph Explorer at https://developer.microsoft.com/en-us/graph/graph-explorer
- Sign into your Microsoft account in Graph Explorer
- Click on the Modify permissions tab
- Click the Open the permissions panel link
- Search for “Sites.Read.All”, and check it
- Click the Consent button at the bottom and consent to this permission (this give Graph Explorer all sites read access)
In Microsoft Graph Explorer, set the request type to GET.
The request has the form:
https://graph.microsoft.com/v1.0/sites/{hostname}.sharepoint.com:/sites/{site_path}?$select=id
For example:
https://graph.microsoft.com/v1.0/sites/simplypress1.sharepoint.com:/sites/MySite?$select=id
The response includes the “id” field which has the form:
{hostname},{spsite.id},{spweb.id}
For example:
simplypress1.sharepoint.com,beb83f0e-b0bb-49de-beb7-50e209ee90c3,bc13d239-edae-4536-8c46-5eee295bfd7a
This is the Site ID, save this value for later
In this section we will set up the permissions for the Azure AD App you created.
Go the the API permission tab and add the following two Application permissions under the Microsoft Graph API:
- Sites.FullControl.All - This permission is temporary and will be removed at the end.
- Sites.Selected
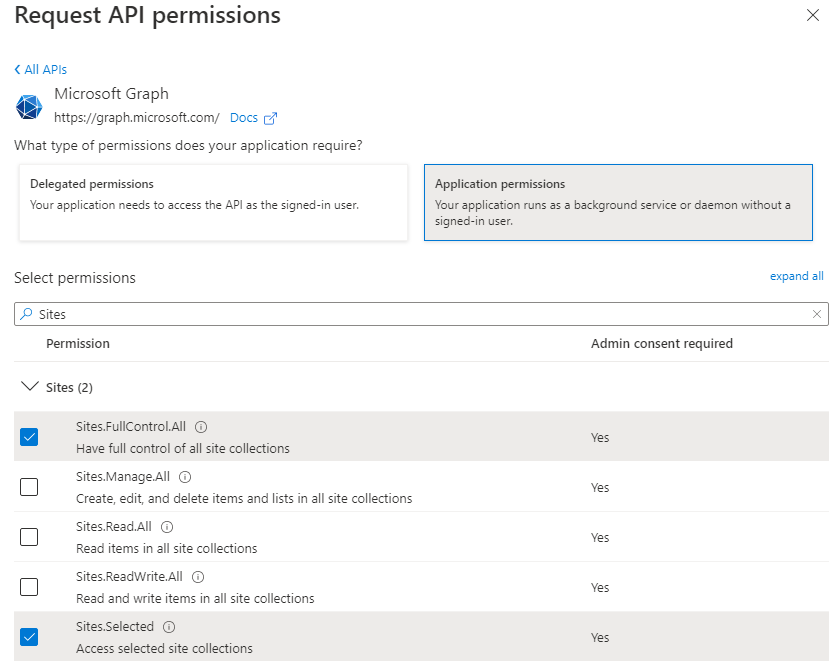
Then Grant admin consent for those permissions.
We will be using the Sites.FullControl.All permission you configured earlier to configure read/write permissions to the desired SharePoint site.
Before you can send the request, you need to configure OAuth2.0 in Postman. So create a new request and follow these steps:
- Go to the Authorization tab
- Set the Type to OAuth2.0
- Under Configure New Token > Configuration Options, set the following fields:
- Grant Type to “Client Credentials”
- Access Token URL to the endpoint
https://login.microsoftonline.com/{tenant_id}/oauth2/v2.0/token - Client ID to your Application (client) ID
- Client Secret to the value of a secret for your App
- Scope to
offline_access https://graph.microsoft.com/.default - Client the Get New Access Token button and Proceed
Set the request type to POST and the endpoint to:
https://graph.microsoft.com/v1.0/sites/{Site ID}/permissions
with JSON body to:
{
    "roles": [
        "write"
    ],
    "grantedToIdentities": [
        {
            "application": {
                "id": "{client_id}",
                "displayName": "{app_name}"
            }
        }
    ]
}
You should receive a 201 Created response code on a success.
At this point you should have access the the desired site only via the Graph API.
Before testing if it works you should remove the full control permission in the Azure AD App dashboard, under the API permissions tab. Click the three dots next to this permission and remove both permission and consent.
Create a new request in Postman with the same Authorization setup as the previous request (You can reuse the existing request or duplicate it).
Set the request to GET with no body and the endpoint to:
https://graph.microsoft.com/v1.0/sites/{Site ID}
The {Site ID} here is the one you saved when you received it from Graph Explorer.
This is the REST API endpoint for your site.
You should receive a 200 OK response code for the site you gave access to.
You can also get a different site’s ID and test access to that site with this same request. Any other site should give you a 403 Forbidden response code.